Setup
This page will guide you through the setup of the plugin. It explains installation, setting up two important data tables, and placing output actors.
Installation
Manual installation
The plugin has not yet been put on a marketplace. Therefore, this section explains how to install it manually, given you have the packaged version downloaded.
To install the plugin, open up your Unreal project in the file explorer. If there is no Plugins folder next to your .uproject file, create it. Then, drag the downloaded plugin (as a directory) into the Plugins folder.
After restarting the engine, open up the Plugins Browser tab (Edit → Plugins) and search for the plugin called SportsCommentary – make sure it is enabled.
Voicelines Data Table
First, you will need to create a new data table for your voicelines. Navigate to a suitable location in your Content folder and click Add → Miscellaneous: Data Table. As the row structure, select VoicelineDataTableRow, and then give the table a name (for example, DT_Voicelines).
This asset is where you will be specifying your voicelines.
Interchangeables Data Table
Do not skip this step!
While using interchangeable content is optional, the data table’s presence is expected. Create it as described below to avoid errors in the log.
Second, you will need to set up a data table for interchangeables. Unlike the table for voicelines, this one does not require a specific row structure. Instead, you create columns based on which inflections you want to support.
Example row structure
An example row structure is packaged with the project, called “InterchangeablesDataTableExampleRow”. You can use it for inspiration or quick testing. However, creating your own structure is recommended, so that you can easily edit it later.

Columns used by the example row structure
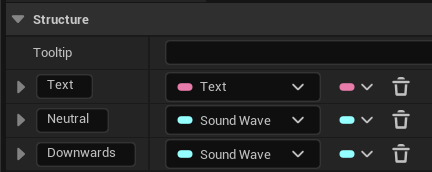
Start by creating a Structure somewhere in your Content folder (Add → Blueprint: Structure) and giving it a name (for example, FInterchangeablesDataTableRow). Open it and add the following variables (columns for the table):
- variable called “Text” of type Text – This is a mandatory column and will be used for subtitles.
- variable called “Neutral” of type Sound Wave (Soft Object Reference) – This is the default inflection (if you prefer, you can rename it in the Project Settings).
- any number of other variables of type Sound Wave (Soft Object Reference) – These are additional inflections that you plan to support.
The result should look something like this:
Selecting inflections
What inflections to support in your commentary will depend on the specific needs and scope of your project. It is not required to always record every inflection, so feel free to add extra columns. In any case, you can always tweak the structure later.
Once you have your Structure ready, create a new data table (Add → Miscellaneous: Data Table) and select the structure. A possible name for the table could be DT_Interchangeables.
This asset is where you will be specifying your interchangeables.
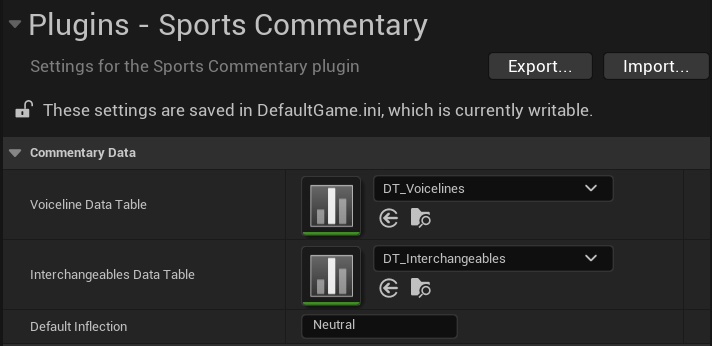
Selecting the Tables
Once you have both data tables ready, select them in Edit → Project Settings. Navigate to Sports Commentary (under Plugins) and fill in the two fields.
Composite Data Tables
As your commentary system grows, you may want to categorise your voicelines and interchangeables into smaller tables. You can then create a Composite Data Table (Add → Miscellaneous: Composite Data Table) to group your tables in. Afterwards, select the composite in Project Settings.
Once you have the tables selected, open up the Output Log and clear it using right click → Clear Log.
Play any level and check the log again. You should see no new LogCommentary errors!
Setting up Output Actors
With the data tables set up, the system is now functional. However, when a voiceline is played, you will not hear nor see anything. That is because there are no outputs set up. Place one or both of the following actors into all maps where you want commentary:
- For playing audio: BP_CommentaryAudioPlayer
- For displaying subtitles: BP_CommentarySubtitleDisplay
To quickly find these, you can press Ctrl + P to bring up the Open Asset window. Search for the desired actor and drag it into the map. Note that it is also possible to create your own subtitle widget, or a fully custom output outright – for that, see Custom Outputs.
Now you are ready to start Adding content!